Connect Heeler through Tailscale
Heeler joins your tailnet by itself, so the phone needs no Tailscale app or VPN.
Before you start
- You need a Heeler version with Settings > Overlay Networks.
- You need a Tailscale account that can add devices.
- To keep the Mac free of a VPN, follow Run Tailscale without a VPN on the Mac (advanced) instead of step 2.
1. Prepare the Mac
Complete Prepare the Host. You don't need Tailscale SSH.
2. Install Tailscale on the Mac
- Download the Standalone app from Install Tailscale on macOS and open it.
- Allow the VPN configuration when asked. On macOS 15 and later, also turn on Tailscale Network Extension in System Settings > General > Login Items & Extensions > Network Extensions. For older macOS, see Tailscale's extension steps.
- Sign in from the menu bar icon, and approve the Mac if your tailnet asks.
- Note the Mac's Tailscale IP on the admin console's Machines page.
3. Join the same tailnet from Heeler
-
Go to Settings > Overlay Networks > Add Network and choose Tailscale.
-
Fill in the form:
Field Value Name Any label, such as Home tailnetDevice name How Heeler appears in the tailnet (default heeler)Advanced Leave blank to sign in with the browser 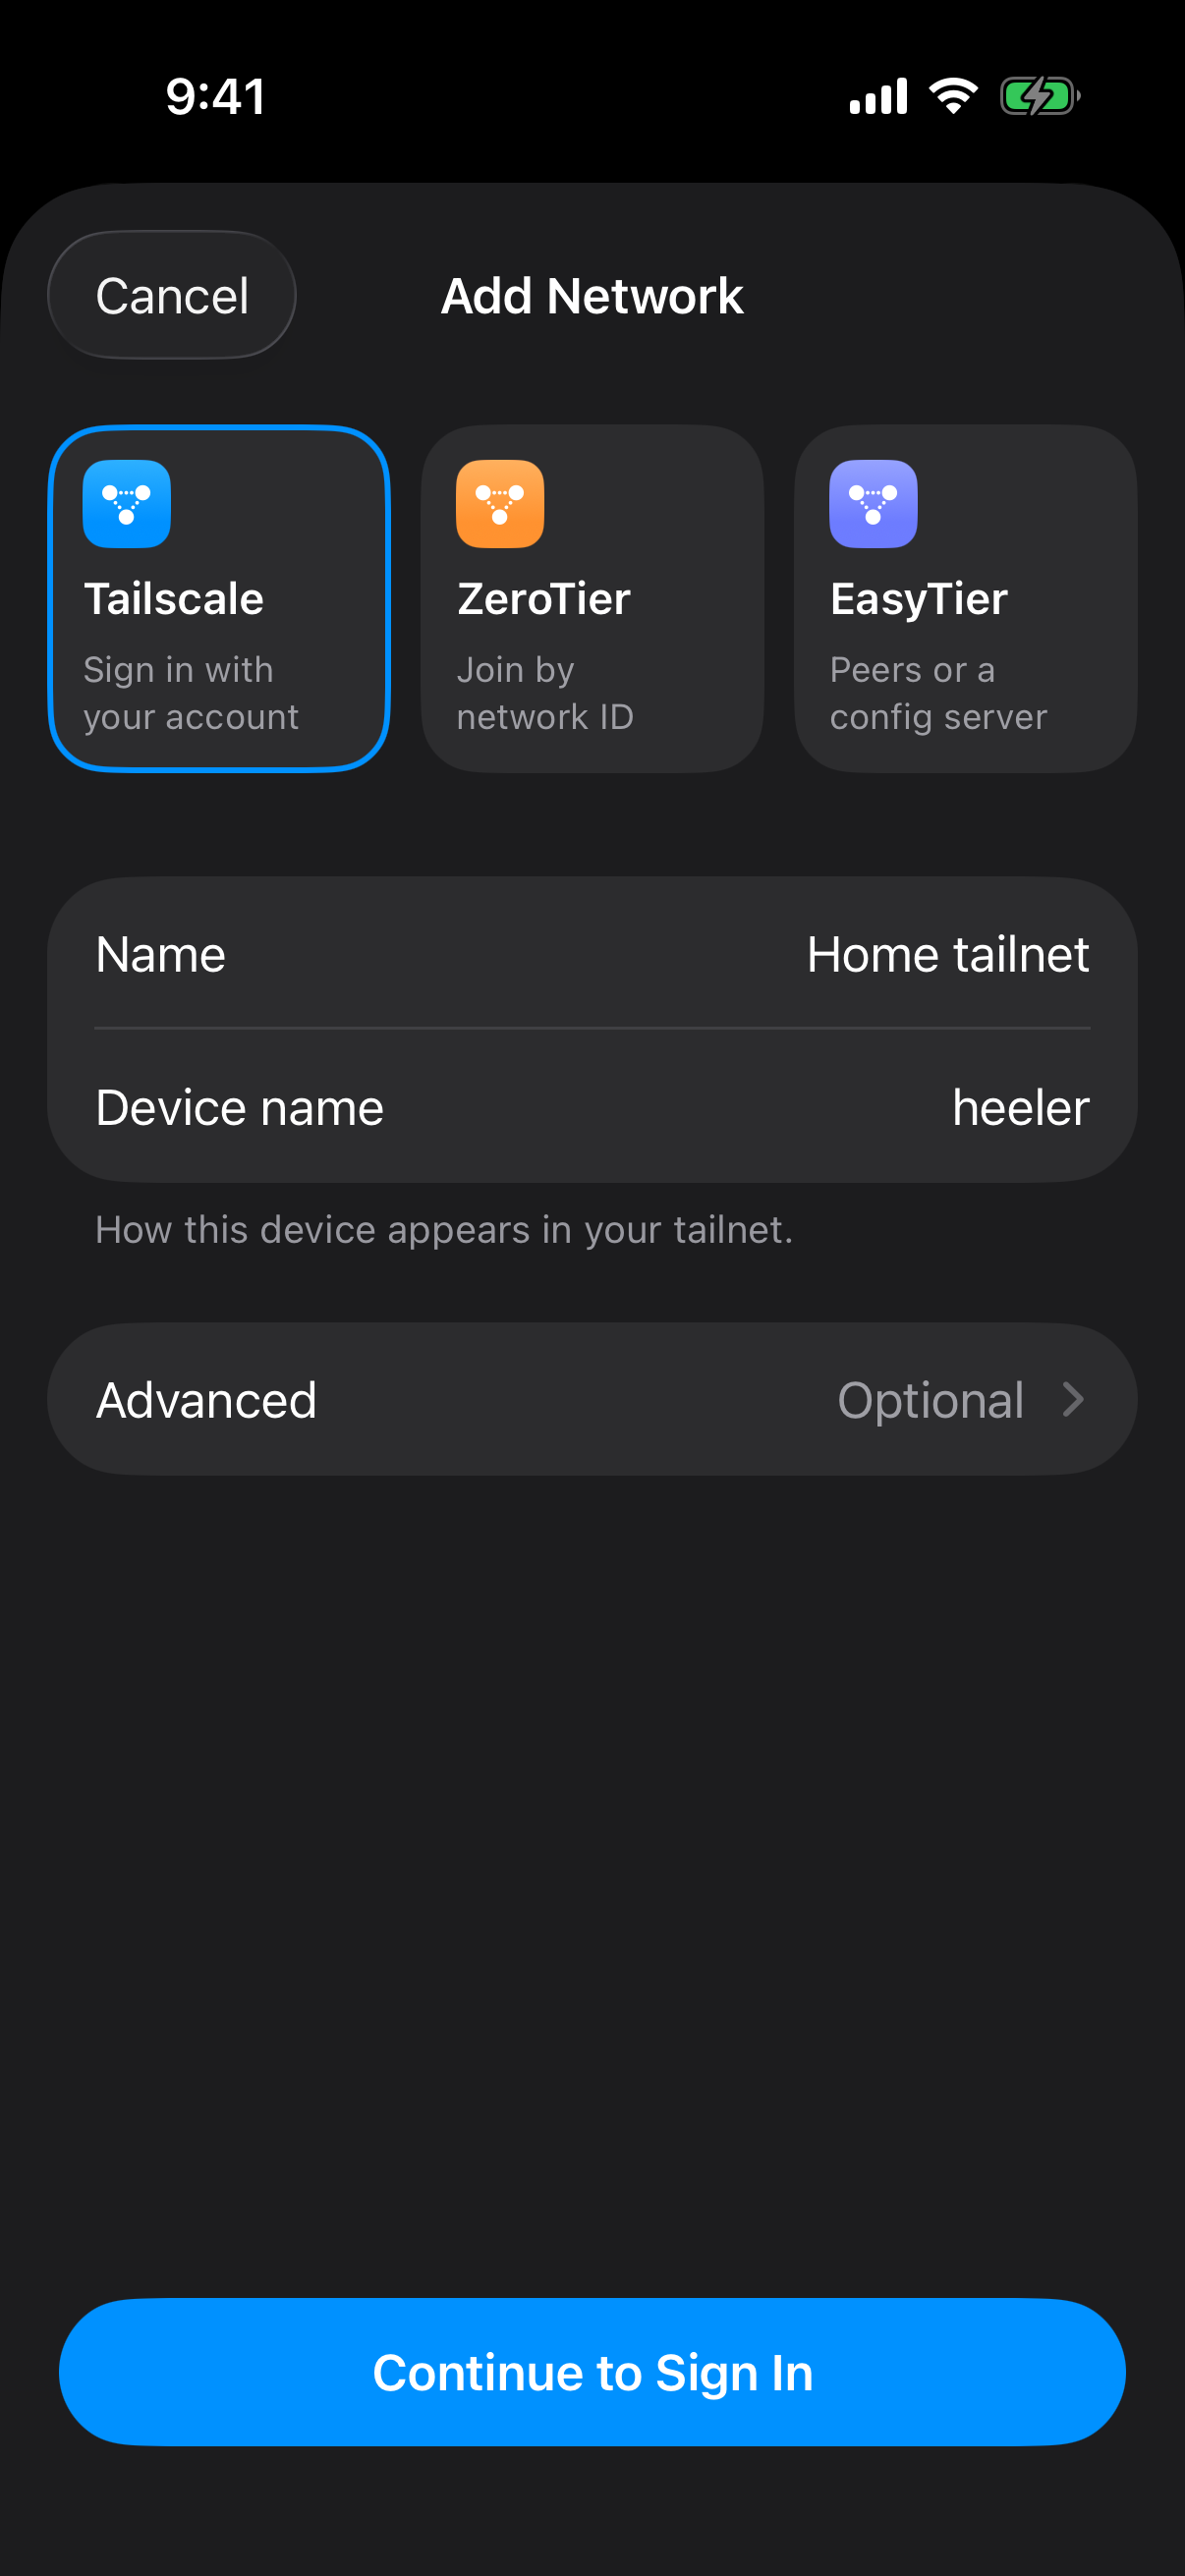
-
Tap Continue to Sign In and sign in with the same account as the Mac.
-
Return to Heeler. It connects on its own and the network shows Connected.
If you see Waiting for approval, tap Open Admin Console and approve Heeler. If you left the browser early, tap Sign In with Browser.
To skip the browser, enter an auth key under Advanced, or tap Use an Auth Key Instead on the network's screen. For Headscale, enter its HTTPS URL as the Coordination server.
If you've changed your tailnet's access rules, make sure Heeler can reach the Mac on port 22.
4. Add the Mac as a Host
Add the Host with these values (details in Connect from Heeler):
- On the network's screen, tap Add beside the Mac to pre-fill its route; or go to Hosts > Add Host, tap Add Route under Routes, select your Tailscale network under Network, tap Choose from Tailnet… (with Fill In on IP Address), and pick the Mac.
- Keep port
22and leave Jump Host blank on the route, then save the route if you opened Add Route. - In Add Host, enter your Mac username (
User) and the sign-in method you picked. - Save, and trust the fingerprint only if it matches the Mac's.
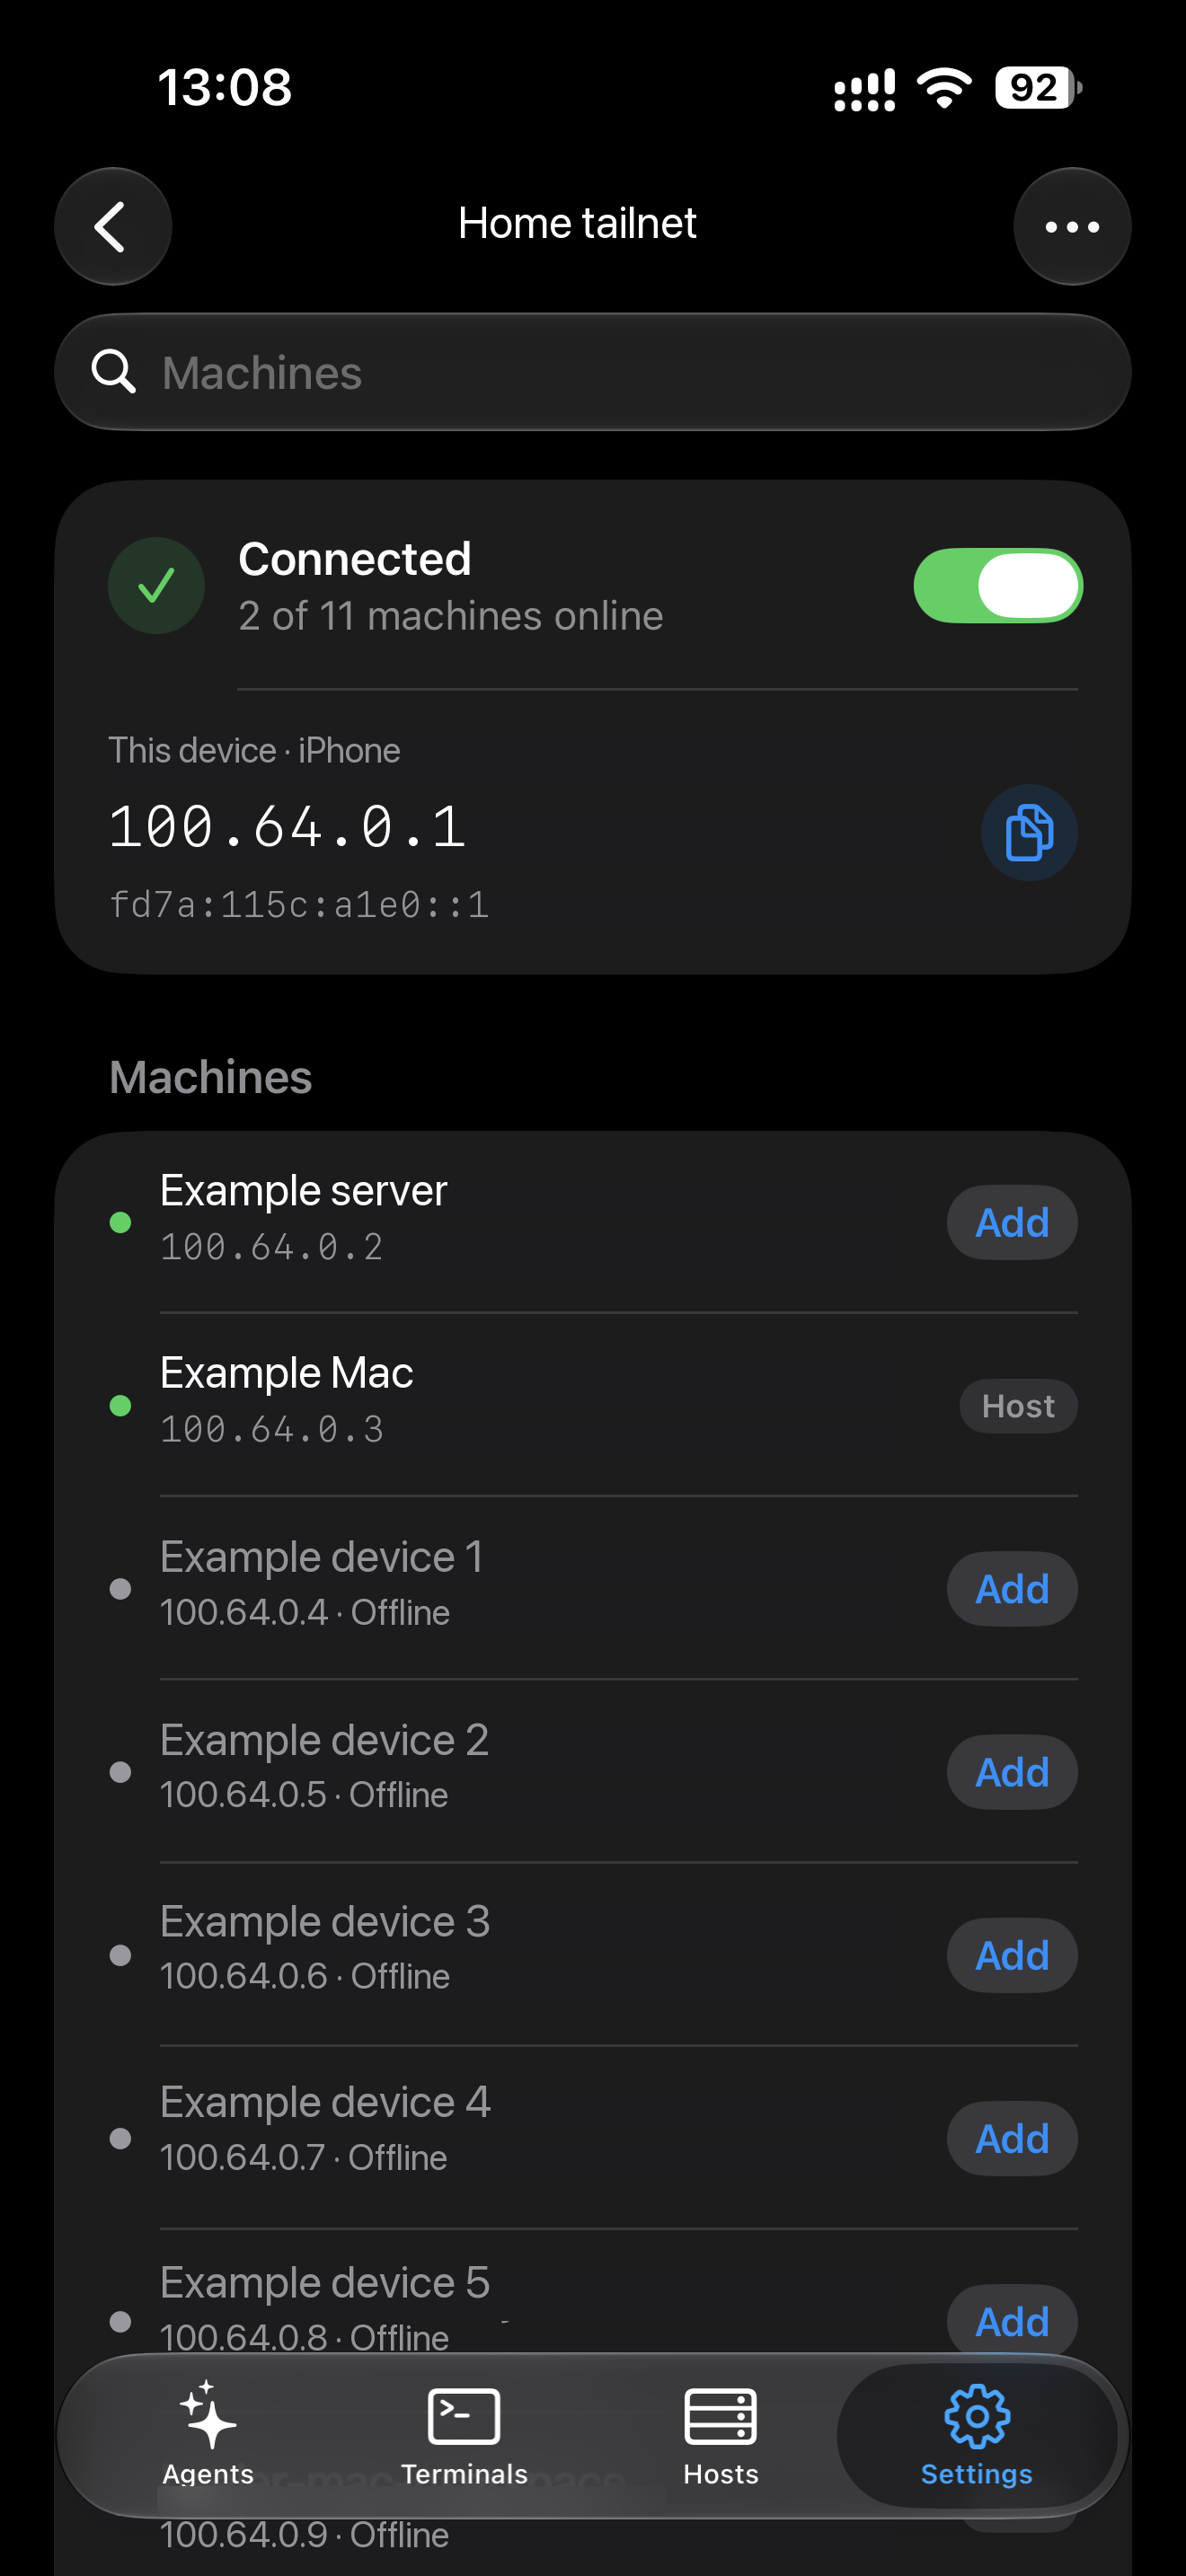
Use the Mac's address under Machines, not the phone's address under This device. This screenshot shows the Mac after it has been added: its button reads Host, while another machine still offers Add. Names and addresses have been anonymized. Tap the image to enlarge it.
5. Check that it works
Complete Verify the connection, including a test over cellular. Keep the Mac awake and signed in to Tailscale.
Run Tailscale without a VPN on the Mac (advanced)
Instead of the Tailscale app in step 2, you can run Tailscale on the Mac from Terminal, so the Mac gets no VPN or network extension. Heeler still joins the same tailnet and logs in to the Mac over its normal SSH. You need Homebrew.
1. Check SSH on the Mac
After Prepare the Mac, check that SSH answers on the Mac itself:
nc -vz 127.0.0.1 22The connection should succeed. If it is refused, check that Remote Login is on.
2. Install Tailscale with Homebrew
brew install --formula tailscaleDon't start it with brew services; use the next step instead.
3. Start Tailscale
Open a Terminal window (Terminal A) and run:
TS_BIN="$(brew --prefix tailscale)/bin"
TS_STATE_DIR="$HOME/.local/share/heeler-tailscale"
umask 077
mkdir -p "$TS_STATE_DIR"
chmod 700 "$TS_STATE_DIR"
"$TS_BIN/tailscaled" \
  --tun=userspace-networking \
  --statedir="$TS_STATE_DIR" \
  --socket="$TS_STATE_DIR/tailscaled.socket"
Leave Terminal A open until you finish signing in and checking the connection. To run without an open terminal after that, set up automatic startup.
4. Sign the Mac in
Open a second window (Terminal B) and run:
TS_BIN="$(brew --prefix tailscale)/bin"
TS_STATE_DIR="$HOME/.local/share/heeler-tailscale"
"$TS_BIN/tailscale" --socket="$TS_STATE_DIR/tailscaled.socket" up \
  --hostname=heeler-mac-userspace
"$TS_BIN/tailscale" --socket="$TS_STATE_DIR/tailscaled.socket" status
"$TS_BIN/tailscale" --socket="$TS_STATE_DIR/tailscaled.socket" ip -4- Open the login link that
upprints and sign in to the tailnet Heeler will join. - If your tailnet requires device approval, approve the Mac in the admin console.
- Write down the IPv4 address that
ip -4prints.
Important
In this mode, any tailnet device that is allowed to reach the Mac can connect to every service listening on the Mac itself, not only SSH. In your tailnet's access rules, allow Heeler to reach this Mac only on tcp:22.
Then continue with Join the same tailnet from Heeler through Check that it works. In Add the Mac as a Host, tap heeler-mac-userspace in Choose from Tailnet…, or type the IPv4 address you wrote down. Keep the Mac awake and Terminal A open while you use Heeler.
5. Start automatically after login (optional)
Use a user LaunchAgent to start this same userspace daemon whenever you log in to the Mac, and restart it if it exits. No sudo or system VPN is needed. It reuses the state directory above, so you keep the same Tailscale identity and IP without signing in again unless authorization expires.
This starts after you log in, not before login after a reboot. It cannot run at the FileVault unlock screen or keep a sleeping Mac reachable. For unattended access before user login, a system LaunchDaemon requires separate administrator setup; that is not covered here.
First, press Control-C in Terminal A. Do not run the manual daemon and the LaunchAgent at the same time.
In Terminal B, find the absolute paths and create the LaunchAgents directory:
brew --prefix tailscale
printf '%s\n' "$HOME"
mkdir -p "$HOME/Library/LaunchAgents"
Create ~/Library/LaunchAgents/dev.heeler.tailscaled.plist with the following content. Replace every TAILSCALE_PREFIX with the first command's output (normally /opt/homebrew/opt/tailscale on Apple Silicon or /usr/local/opt/tailscale on Intel), and every MAC_HOME with the second command's output. Use absolute paths, not ~, $HOME, or shell commands inside the plist.
<?xml version="1.0" encoding="UTF-8"?>
<!DOCTYPE plist PUBLIC "-//Apple//DTD PLIST 1.0//EN" "http://www.apple.com/DTDs/PropertyList-1.0.dtd">
<plist version="1.0">
<dict>
    <key>Label</key>
    <string>dev.heeler.tailscaled</string>
    <key>ProgramArguments</key>
    <array>
        <string>TAILSCALE_PREFIX/bin/tailscaled</string>
        <string>--tun=userspace-networking</string>
        <string>--statedir=MAC_HOME/.local/share/heeler-tailscale</string>
        <string>--socket=MAC_HOME/.local/share/heeler-tailscale/tailscaled.socket</string>
    </array>
    <key>RunAtLoad</key>
    <true/>
    <key>KeepAlive</key>
    <true/>
    <key>ThrottleInterval</key>
    <integer>10</integer>
    <key>StandardOutPath</key>
    <string>MAC_HOME/.local/share/heeler-tailscale/tailscaled.log</string>
    <key>StandardErrorPath</key>
    <string>MAC_HOME/.local/share/heeler-tailscale/tailscaled.log</string>
</dict>
</plist>
Validate and load it from a terminal in your Mac desktop session:
PLIST="$HOME/Library/LaunchAgents/dev.heeler.tailscaled.plist"
chmod 600 "$PLIST"
plutil -lint "$PLIST" && launchctl bootstrap "gui/$(id -u)" "$PLIST"
launchctl print "gui/$(id -u)/dev.heeler.tailscaled"
If validation fails, fix the plist before loading it. The service should show state = running. Check that Tailscale is still signed in and its IP matches the one you recorded:
"$(brew --prefix tailscale)/bin/tailscale" \
  --socket="$HOME/.local/share/heeler-tailscale/tailscaled.socket" status
"$(brew --prefix tailscale)/bin/tailscale" \
  --socket="$HOME/.local/share/heeler-tailscale/tailscaled.socket" ip -4
You can now close both terminals. Check the Host from Heeler again, then repeat the check after restarting the Mac and logging in. To diagnose startup failures, inspect launchctl print above and the log:
tail -n 50 "$HOME/.local/share/heeler-tailscale/tailscaled.log"To stop the managed daemon, unload it rather than killing its process (which KeepAlive restarts):
launchctl bootout "gui/$(id -u)/dev.heeler.tailscaled"Load it again with the bootstrap command above. To disable automatic startup permanently, also remove the plist after unloading it:
rm "$HOME/Library/LaunchAgents/dev.heeler.tailscaled.plist"Stop or remove the Mac
For a manual daemon, press Control-C in Terminal A to stop tailnet access. To start again, run Start Tailscale. It also stops when you restart the Mac or log out. If you set up automatic startup, use bootout above instead; the LaunchAgent starts again at your next login unless you remove its plist.
To remove the Mac from the tailnet, run this while the daemon is still running (manually or under the LaunchAgent):
"$(brew --prefix tailscale)/bin/tailscale" \
  --socket="$HOME/.local/share/heeler-tailscale/tailscaled.socket" logout
Then stop the daemon. For the LaunchAgent, unload it and remove its plist as described above; for a manual daemon, press Control-C in Terminal A. Only then delete the saved state:
rm -rf "$HOME/.local/share/heeler-tailscale"If the Mac still appears in the Tailscale admin console, remove it there.
Troubleshooting
| Problem | Try this |
|---|---|
| The Mac isn't in Choose from Tailnet… | Check that both are in the same tailnet and approved, or type the Mac's Tailscale IP into Address. |
| SSH times out | Check that the Mac is awake and online, and your access rules allow port 22. |
| SSH sign-in fails | Use the Mac account's key or password, not your Tailscale login. |
| SSH works but herdr checks fail | Recheck herdr in Prepare the Host. |
| Not signed in or Signed out | Tap Sign In on the network's row, or open the network and tap Sign In with Browser. |
| Without a VPN: Terminal B can't connect to Tailscale, or shows a different machine | Keep Terminal A running or check the LaunchAgent, and use the guide's exact socket path. |
| Without a VPN: the Mac is online but SSH times out | Check that nc -vz 127.0.0.1 22 works on the Mac, and that your access rules allow Heeler to reach the Mac on tcp:22. |
| Without a VPN: other Mac apps can't reach tailnet devices | Expected. In this mode, the Mac's own apps get no tailnet access. Tailnet devices can still reach the Mac. |
| Without a VPN: it stopped working after a restart | With automatic startup, log in to the Mac and check the service and log. Otherwise, run Start Tailscale again in Terminal A. |
Sign out or remove Heeler
Sign Out, in the network screen's … menu, signs out only Heeler, never the Mac. Its Hosts stay disconnected until you sign in again.
To remove Heeler's access, delete its device on the admin console's Machines page, and revoke any auth key you used on the Keys page.
Checked against Tailscale's documentation on 2026-10-09. Commands without a VPN were checked against Tailscale 1.104.1 in October 2026.